

How To Repair Wood Floors Without Sanding
I love the expect and durability of wood floors, and it'due south non but considering I've been installing them since 1978. I'thousand impressed by a surface that receives such a tremendous amount of abuse yet—when installed properly—lasts as long equally a house. Installing a wood floor requires a substantial investment in materials and labor. When problems arise or when a floor fails, it can exist costly. Every year, an estimated $1 billion worth of hardwood-flooring damage occurs across the country.
As a consultant and writer for the National Forest Floor Association (NWFA; world wide web.woodfloors.org), I've fabricated information technology my business to understand what causes all that damage. The good news is that if you take your fourth dimension, use the appropriate tools and techniques, and empathise forest acclimation, you can create a floor that lasts a lifetime.
one. Aberrant GAPS

Not all gaps are bad, merely these are. The gaps pictured here are too big and irregular. They take abroad from the overall look of the floor, which should be relatively uniform across its surface.
Woods floors are prone to motion. Installed correctly, floorboards concur tight to one another during humid times of the year and might reveal gaps during drier times. Abnormal gaps are generally the result of flooring that's too wet when it is installed (sidebar p. 80), but they also can exist the consequence of installing flooring in areas of excessive dryness. I've worked on floors that had abnormal gaps because floorboards were installed directly over heating ducts, in areas that received a lot of sunlight, and in homes heated with woodstoves, which creates a dry interior environment.
Gaps are an aesthetic issue and should be repaired when they disrupt the overall look of a floor, not when they measure a particular width. I repair abnormal gaps during the virtually humid time of year, when they are at their smallest. If I repair gaps when they are at their widest, I might not leave sufficient clearance between floorboards and create a floor that buckles when it expands.
Also, I never use wood filler to repair gaps. Instead, I make a patch by gluing slivers of wood to the edges of the floorboards. I'm careful to use glue to only ane side of the sliver so that I don't gum whatever boards together.
2. CUPPING

When the bottom of a board is wetter than the top, its edges loving cup. Wide plank floors are more prone to cupping, but I've seen it happen to strip flooring as well.
Most oft, cupping happens when flooring is installed over a wet basement or crawlspace. A vapor retarder installed betwixt the subfloor and the floorboards can help the condition by slowing moisture migration, just information technology shouldn't be relied on equally a permanent solution to moisture problems. I use Aquabar "B" by Fortifiber (www.fortifiber.com) as a vapor retarder for strip flooring installed over conventionally framed floors. I use Bostik'south MVP (world wide web.bostik-u.s..com) trowel-applied membrane when I'yard laying floors over slabs and radiant-heating systems and when I'chiliad installing wide plank flooring.
Some cupped floors lie flat once moisture issues are corrected. Other floors might be plain-featured permanently. A flooring that doesn't lie flat needs to exist sanded, but only when the moisture content of the top and lesser of the boards is within 1%. I drive a wet meter through the subfloor to check the bottoms of the boards. If you sand the peaked edges of a cupped floor as well presently, you could have crowned boards when they're fully dry out.
Moisture resistant, not moisture-proof. Aquabar "B," which is composed of ii layers of kraft paper laminated with asphalt, slows the motion of moisture through a subfloor, but it doesn't end information technology. An elastomeric membrane has similar characteristics, just is all-time used in glue-down flooring applications.Courtesy of Bostik
3. BUCKLING

Boards buckle if they can't expand. When floorboards aren't acclimated or are exposed to lots of wet, they can beat together and lift off the subfloor.
When wood flooring becomes too moist, information technology can expand to the point that it lifts off the subfloor, moves door frames, and pops trim from the wall. A floor can buckle because of a damp basement, because of a overflowing, or because the flooring was installed when it was too dry. In whatsoever case, the crusade of buckling is always moisture, and improper fastening can aggravate the status. Nails could exist the wrong size or could exist spaced too far autonomously. On mucilage-down installations, using the incorrect size trowel can lead to a poor bond betwixt the floorboards and the subfloor.
I've been able to refasten some buckled floors, but others had to be removed. I reuse floorboards when possible, but if the tongues and grooves are torn autonomously or if the boards are croaky, I replace them. I don't repair buckled floors until the moisture issues in the habitation have been fixed and the moisture content of the floorboards and subfloor is at the advisable level (come across Acclimatize a flooring correctly at the stop).
4. PEELING FINISH

A contaminated floor won't hold finish. Dirt or chemicals on top of a floor or embedded in its finish can cause subsequent coats of end to fleck or pare off.
Flooring finishes peel because the floor was contaminated or improperly prepped when the finish was applied. Excessive sanding with high-dust paper can burnish wood and create a surface too polish for the terminate to adhere. Inadequate abrading or cleaning betwixt terminate coats, applying a top glaze over a floor that is not dry out, or working with incompatible finishes all can crusade peeling. Yet, the most mutual cause of peeling that I see is stain rest that isn't cleaned from the floor prior to applying finish. To foreclose a buildup of stain residue, I remove excess stain no later than three minutes later on information technology was applied and let the floor dry thoroughly before applying the finish. I don't apply multiple coats of stain or let stain sit in an attempt to darken wood.
The best way to fix a peeling floor is to sand it downwards to bare wood and restart the finishing process. But abrading the floor and applying a new top coat might not ready the problem. Without resanding, waxes, oils, and article of furniture polishes used to clean wood floors seep into the pores of the stop and tin can prevent the new finish from bonding successfully.
5. EXCESSIVE Clothing

Don't ever blame the dog for fast-wearing floors. A worn flooring lacks sheen and evenness in color. Poor finishing techniques can be the cause as much every bit family pets and household abuse.
All wood floors eventually wear out, simply when they're in rough shape only a couple of years after being finished, something went wrong. Likely, the floor wasn't sanded properly, the cease was built up too quickly, or the floor wasn't maintained correctly.
On floors that are not sanded finely enough, the end settles in the bottom of the sanding grooves, but the tops of the grooves are covered with little cease. When the floor is exposed to foot traffic, the surface breaks down. I sand bare boards to 100 grit or 120 grit, depending on the finish I'chiliad using. In other cases, I've seen layers of stop built upward too apace. When multiple coats of finish are applied without proper drying time, it tin can take six months for the finish to cure. By that time, the floor looks like information technology has aged 10 years.
Even when sanded and finished properly, wood requires regular maintenance. Grit left on wood floors acts like sandpaper when walked on, and unclipped pet nails or unprotected furniture feet can scratch a stop considerably. At times, I've been able to recoat a slightly worn floor without sanding off all the one-time terminate. But when a floor has lots of wear and deep scratches, information technology'due south all-time to sand down the floor to bare woods and refinish information technology.
6. DEBRIS IN THE FINISH

Finishes enhance the bad every bit much equally the practiced. Droppings on the floor surface or in the cease, such as this hair, is magnified when the floor terminate is dry.
Wet stop acts like a big slice of flypaper. Any dust or animal hair that finds its way into it will be magnified once the stop is dry. To prevent debris from ruining the end, I make clean all the room'south surfaces prior to finishing the floor. I wipe down the walls and calorie-free fixtures. Then I vacuum the floor and go over it with a tack cloth. I never use tack cloths designed for use on cars, though. They tin contain silicone, which compromises the finish. I also strain the end and pour information technology into an applicator tray that I've lined with an insideout garbage bag. Last, I remove any loose fibers from the applicator past washing and vacuuming it thoroughly.
If droppings does find its style into the finish, I make repairs by sanding the floor equally I would between coats of finish and utilise a new top coat on the flooring.
7. SANDING BLEMISHES

Worn abrasive screens or sanding pads used to sand between coats of finish can create unsightly scratches in the floor. Subsequent coats of finish magnify these imperfections.

To remove the scratches, the finish needs to be sanded past the glaze where the scratches were initially made. It's oft difficult to tell which glaze of end the scratches were created in, so I tend to sand off all the finish and offset again.
To prevent these scratches, I use 3M annoying pads when sanding between each terminate glaze. I find that these pads leave smaller, more plentiful, only less noticeable scratches. They also create a scratch pattern that promotes a much better adhesion between coats of end. I like to use 150-dust to 180-grit pads when sanding oil-based polyurethanes and 220 grit when sanding between coats of water-based finishes.
Sloppy sanding shows. Using a worn sanding screen to sand betwixt coats of finish tin can get out spiderweb-like defects in floor terminate.
The best sandpaper for the all-time stop. I've used a lot of sanding products and similar 3M abrasives the all-time for all my sanding tasks. They perform well when leveling a floor or prepping for a finish coat.
Randy O'Rourke
8. STAINS

Stains built up on a floor finish can usually exist removed with a forest-floor cleaner (world wide web.minwax.com), but stains in the actual finish must be sanded out. The most hard stains to bargain with are those that penetrate into the wood fibers. Pets are the most frequent culprit in creating these types of stains, simply water can be equally damaging.
 I usually recommend replacing floorboards that have been deeply stained, peculiarly past pet urine. Simply I take had success using 2-role wood bleach (world wide web.kleanstrip.com) to remove stains.
This treatment has some drawbacks, though. Bleach tends to intermission down woods fibers, which increases the wood's susceptibility to denting. Likewise, bleach isn't guaranteed to lift the stains from the wood, which means the floorboards might nevertheless need to be replaced. Finally, the unabridged floor should exist bleached, non only ane expanse. This results in a lot more work, but helps to create a floor that is consequent in colour and sheen.
Pet-stained floors can be saved. This flooring can exist fixed past brushing ii-office wood bleach over the surface. The floor is neutralized after a couple of hours, then sanded and refinished when it'due south dry.
9. FRACTURES
I meet more than cracks in factory-finished floors than in any other blazon of flooring. The finish on these boards is easily damaged by flooring nailers. Most manufacturers, nevertheless, now make adapters for their nailers to prevent the nailers' force from concentrating on the surface of the floorboards. A board with a badly damaged edge should accept been replaced when the harm occurred. If information technology wasn't, I have the time to supplant it. (Encounter "New Life for an Old Floor")
Cracks also can form on the face of factory-finished and regular floorboards. This damage is generally attributed to checks in the wood. Some forest species are more prone to keen than others. Cracking besides can exist caused by the manufacturer. If the woods is stale too rapidly in the kiln, it can cleft.
Mill-finished boards tin be stock-still with a manufacturer repair kit, which typically consists of wood filler, colored marker, and a bottle of finish. If I tin can't get a kit, I go along the same way as I would with regular flooring. I replace the board, or I fill the crack with wood filler and employ a coat of finish over the entire floor then that colors, tones, and sheen match perfectly.
 |  |
10. POLY DROPLETS

When small-scale polyurethane aerosol form along the edges of each floorboard, moisture is always to arraign. The droplets are caused past polyurethane flowing into the gaps between floorboards while the floor is moving. The problem generally occurs when a floor is existence finished during the change betwixt dry and humid seasons. Equally the boards conform to the climate, they expand, forcing any uncured polyurethane from the gap.
If defenseless in fourth dimension, poly droplets tin can exist removed with a razor bract, a rag, and floor cleaner. If a mess has already been made, either past walking on the aerosol or by allowing them to cure, then each droplet needs to be cut off the floor by hand with a razor bract before the entire floor is abraded in preparation for a fresh top coat.
11. IRREGULAR FLOORBOARDS

The baloney is in the wood, non the terminate. Every floorboard contains both soft leap wood, which is the dark grain in each board, and dumbo tardily-season woods. The soft jump wood in this floor was dug out past improper sanding.
Dished-out deformities in floorboards are typically caused by poor sanding techniques or by heavy wear in spring forest. Spring wood, the part of the tree that grows quickly early in the flavor, has the least dense cell structure of whatever role of the tree. This wood is softer and less durable than the slower late-season growth, where cells are stacked more densely. Bound wood is easily misshapen by heavy foot traffic, sliding furniture, pets, and other daily household abuse.
Poorly maintained drum sanders, depression-quality abrasives, or incorrect sanding too tin can create irregular floorboards. Drum sanders with damaged sanding belts, damaged fan belts, or worn-out wheels tin create chatter marks on a floor. Churr marks appear uniformly across the grain of each board and event in a flooring that looks wavy.
Fortunately, I've never seen irregular floorboards that couldn't be fixed. The floor needs to exist flattened with a quality pulsate sander oriented at a slight bending to the boards; with a triplanetary sander, which has iii orbiting heads; or with a buffer that has a hard-plate attachment. Of form, the flooring will need to be refinished.
Rent the right sander

When it comes to creating a great-looking woods flooring, nothing is as imperative as properly sanding the floorboards. Whether you're trying to flatten a floor or simply abrade it for a fresh glaze of finish, the sander you choose has a significant impact on the quality of the job.
The all-time rental sander (for the nonprofessional) that I've come beyond for all sanding applications is the four-headed random-orbit machine from U-Sand (www.u-sand.com). This sander is aggressive plenty to take downwardly floorboards, notwithstanding gentle enough for light abrading between finish coats. It likewise allows you to sand tight against walls, which eliminates having to rent an edger or hopping down on your knees with a sanding block. Yous don't accept to worry about orienting the sander with the grain or gouging the flooring as you would with a drum sander, and a built-in dust-collection arrangement improves both rubber and performance.
The sander does have one major caveat. I've found that it isn't tolerant of skipping more one grit size per sanding footstep. If you skip grits, yous'll never go all the rough-sanding scratches out of the flooring.
U-Sand machines can be rented from stores including Truthful Value (www.truevalue.com), Chiliad Rental Station (www.grandrental.com), Taylor Rental (www.taylorrental.com), and The Domicile Depot (www.homedepot.com).
Foolproof operation, professional results. The four orbiting heads on the U-Sand rental automobile can handle every aspect of floor sanding and eliminate the possibility of gouging the floor.
Acclimate a flooring correctly
Acclimating a floor is the process of adjusting the flooring'due south moisture content to correspond closely with the moisture content of the environment it's beingness installed in. Non all flooring needs to exist acclimated, though. Some engineered flooring comes wrapped in plastic at the manufacturer'due south desired moisture level.
From the truck to the subfloor
In remodels, flooring can be brought into the habitation as soon every bit in that location is space for it. In new construction, flooring should be brought into a home only after the HVAC system has been in operation for at to the lowest degree ane week.
To speed up acclimation, I remove strip flooring from its boxes and spread it over a clean, dry subfloor that has been covered with a vapor retarder. I stack wide plank flooring in a pile with shims between each board to increase air circulation. Then, I weight the top of the pile to continue the boards flat. Depending on how much moisture needs to be added or removed from the boards, I add a humidifier or dehumidifier to the room. I then have moisture readings periodically on as many boards every bit I tin.
Install flooring when it has the right wet content
The interior temperature and relative humidity of a house determine the correct wet content for a wood floor. Relative humidity can be measured with a humidity approximate, which tin be bought at hardware stores, and ideally should autumn between 30% and 50%. In a home kept at 70°F with that humidity range, floor should be installed when information technology has a wet content of vii.seven%. Homes don't always have ideal humidity levels or temperatures. Information technology's best to decide the expected relative-humidity range and interior-temperature range and acclimate your flooring to autumn in the middle of the spectrum (chart beneath).
Environment and floor type tin can make acclimation tricky
Some homes accept desperate swings in both temperature and relative humidity. Most the coast, for example, my house has a relative-humidity level of 30% and an boilerplate indoor temperature of lxx°F in the winter. In the summertime, when the doors and windows are open up, the humidity level within can fasten to 78%. Engineered floor or quartersawn flooring is the best option for my dwelling because they're less susceptible to motility. I still acclimated my floors to the midpoint of my moisture range at seventy°F, so I don't have gaps in the winter or buckling in the summer. I install broad plank flooring when information technology has a slightly high moisture content. This provides extra room for floorboards to aggrandize throughout the twelvemonth.
4 Steps t0 properly acclimated boards
This chart, provided past the Forest Products Laboratory, indicates proper floor moisture values with regard to relative humidity and interior temperature.

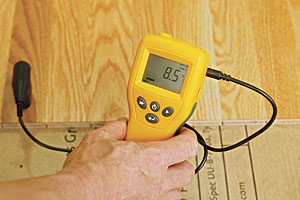
Mag extra: An accurate moisture meter is the almost important tool a wood-floor installer can use. Lookout man video of Charles Peterson explaining the departure between the two types of meters and when to apply them.
For more information, cheque out this video series on installing wood floors.
Click below to download a PDF of this article.
More than on Wood Floors:
A Closer Look at Solid-Wood Flooring – The ins and outs of an enduring favorite.
Install Woods Flooring Series: Racking the Floor – Spread out all your floor in advance to get even distributions of colors and textures.
Salvage Time With a Prefinished Wood Floor – Factory-finished products mean less work on site, but they demand a more conscientious installation.
A Faster, More Durable Floor Terminate – Portable UV equipment yields a fully cured finish in seconds, not days.
Edifice Skills: Install a Subfloor – The subfloor is the layer of structural sheathing applied direct to the joists that provides a base for all the finish floors to come up. Some types of flooring, such equally carpeting or traditional hardwood, can be installed directly on elevation of the subfloor.
Fix for a Scratched Wood Floor – Q: My house has continuous Brazilian crimson wood floors with no thresholds. They're finished with three coats of polyurethane, but new scratches announced on a daily basis. Refinishing one flooring …

Source: https://www.finehomebuilding.com/2008/11/12/11-wood-flooring-problems-and-their-solutions
Posted by: roystonthoromem.blogspot.com
0 Response to "How To Repair Wood Floors Without Sanding"
Post a Comment